How to create a Weebly Website - for classroom use
Printable Instructions
- Go to Weebly for Education - https://education.weebly.com/
- Enter a username, password, and your K-12 email address to create a Weebly account.
- Once you get into the program, select "create site".
- You can select any Theme, if you do not like it, you can change it at a later time. (I have found themes under Portfolio and Personal work well for classrooms, but feel free to try others. All templates can be altered.)
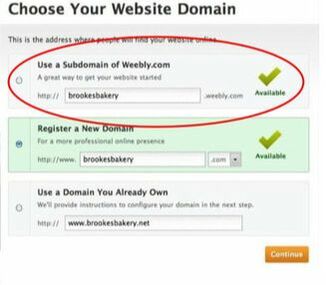
- Next, you will be asked to select your website domain name: Use the Subdomain as this domain is completely free. Work to find a name that is professional and unique to you and your class. A green check mark will appear when an available name is typed into the bar. Click "Continue" at the bottom of the page when done.
6. You are now at the Weebly template worksite.
HOW TO EDIT HOME PAGE and CHANGE HYPERLINK FONT COLOR:
HOW TO ADD NEW PAGES OR WORK ON OTHER PAGES:
CHARGE ORDER OF PAGES or HIDE WEBPAGES FROM PUBLIC:
HOW TO ADD A GOOGLE CALENDAR TO YOUR WEEBLY:
HOW TO EDIT HOME PAGE and CHANGE HYPERLINK FONT COLOR:
- Click on the title at the top. You should get a pop-up bar with three words: OFF, TEXT, LOGO. Text should be highlighted blue.
- You should be able to highlight the text and change the wording to the title you want for your website. (This will change the title on all pages for you!)
- You will need to decide what function your Home page service. Will it be an introduction to your class? Will it be directional or informational for students and/or parents?
- To add Titles, Text, Images, a Gallery of pictures or a Slideshow of pictures, you just go to the left side of your screen and grab the icon and drag it to the main box in the center of your screen and drop it in place.
- Next, add the text or pictures as directed.
- If you wish to add a hyperlink, you can type out of URL address, or you can type of name and then highlight the text you want students/parents to click on, then click on the chain icon in the black box on your screen, click Website URL, paste in the URL link, and then click off the pop up box. (Note: The text will change color indicating it is linked, and you will be able to try the link to be sure it is linked appropriately.)
- If the hyperlink color is too light or you do not feel students or others can tell it is hyperlinked due to the layout colors, click on "Theme" at the top of the page, and then click on "Change Fonts" on the left side of the screen. Next, click on "Links" and then click on the down arrow to the right of "Link Color" to select a different color that you feel will stand out against your theme.
HOW TO ADD NEW PAGES OR WORK ON OTHER PAGES:
- Click on "Pages" at the top of the screen.
- On the top left side, you will see a single "W" and under that the word "Home" for Home page.
- To the left of "Home" is a back arrow. Click the back arrow.
- Next, you will see the word "Pages" and to the right of the word Pages you will see a plus sign.
- If you click the plus sign, you will be able to add more pages to your website. Nearly always, you will add a "Standard Page."
- You can also navigate to any other page you need to work on in your website from this screen. So, when you are ready to create your Contact page, you will come back here to find and work on your Contact page, Home page, etc.
- To add a new page, click on the plus sign.
- Click on "Standard Page"
- On the left side, type in the name you want displayed in the website for the webpage. (You can change it later if necessary.)
- Still on the left side, click on Headers, and then click on "No Headers." The only page you want a header on is, maybe, your Home Page. Therefore, remember to click on "No Headers" on all webpages as it will cause problems if the Header is left on.
- Click back on "Build" to customize your webpage as you wish.
CHARGE ORDER OF PAGES or HIDE WEBPAGES FROM PUBLIC:
- Click on "Pages" at the top of the screen.
- Use the back arrow to go back so "Pages" and the plus sign is showing under the "W."
- Click on the webpage you want to move.
- Click and hold down and move the webpage to the order you would like it to appear on your website.
- Repeat until all pages are in your preferred order.
- Or, if you are working on a webpage and do not want the public to see it or are not read for students to have access to a finished lesson yet, go to the webpage, and check the box that says "Hide in Navigation" under the Page Name. You will still have access to the webpage, but the public will not until you uncheck the box.
HOW TO ADD A GOOGLE CALENDAR TO YOUR WEEBLY:
- Log into your school Google account.
- Watch Video Link
- When you select the different calendars to display, above you will find other boxes you can check and change to alter the calendar view. For example, you can change your calendar view to a Weekly, Monthly, or an Agenda view. You can also alter the height and width at this point as well.
